How do I overwinter vegetable garden beds (zone-specific)?

Preparing your vegetable garden beds for winter is a critical step for soil health, pest control, and ensuring a productive growing season in 2026. Understanding how to overwinter vegetable garden beds (zone-specific) involves tailoring practices like mulching, planting cover crops, and using protective structures to your local climate conditions, primarily determined by your USDA Plant Hardiness Zone.
Key Takeaways
- Zone-Specific Mulching: Apply 2-3 inches of light mulch initially, adding a thicker layer (up to 12 inches in colder zones) after the ground freezes to insulate soil and protect overwintering plants [1, 4].
- Cover Crops: Plant quick-growing cover crops like winter rye or clover 4-6 weeks before the first hard frost to enrich soil, prevent erosion, and reduce compaction [1].
- Protective Structures: Utilize frost cloth, cold frames, or hoop houses to extend the harvest season and protect delicate plants from harsh winter conditions [4, 5].
- Garlic & Perennials: Specific care, such as precise planting depth and timely mulching, is crucial for overwintering crops like garlic and hardy perennial vegetables [1].
- Soil Health: Overwintering practices are primarily focused on maintaining and improving soil structure, fertility, and microbial life [1, 6].
- Pest & Disease Management: Clearing spent plants and debris helps reduce overwintering sites for pests and disease pathogens [1].
- Planning for Spring: Winter preparation is an opportunity to plan crop rotations and bed layouts for the upcoming 2026 growing season [6].
Quick Answer
To overwinter vegetable garden beds effectively, clear spent plant material, amend the soil with compost, and then apply a protective layer of mulch or plant cover crops tailored to your USDA Plant Hardiness Zone. In colder zones, additional protection like cold frames or hoop houses may be necessary to insulate the soil and any overwintering plants from extreme temperatures, while milder zones focus more on soil enrichment and weed suppression.
Why is it Important to Overwinter Your Vegetable Garden Beds?
Overwintering your vegetable garden beds is crucial because it protects and enriches your soil, minimizes pest and disease issues, and sets the stage for a thriving garden in the subsequent growing season. By actively preparing your garden for dormancy, you prevent soil erosion, replenish essential nutrients, and break pest cycles, ensuring your efforts lead to healthier, more productive yields in 2026 [1, 6].
Effective overwintering practices transform your garden’s off-season into a period of regeneration. Without proper care, exposed soil can suffer from nutrient leaching, compaction, and wind erosion. Furthermore, leaving diseased plant debris can provide a sanctuary for pathogens and insect pests to survive the winter, only to re-emerge and attack your new plantings in spring [1]. Investing time in fall preparation saves significant effort and resources come spring, making it a cornerstone of sustainable gardening.
How do I Overwinter Vegetable Garden Beds (Zone-Specific) with Mulch?
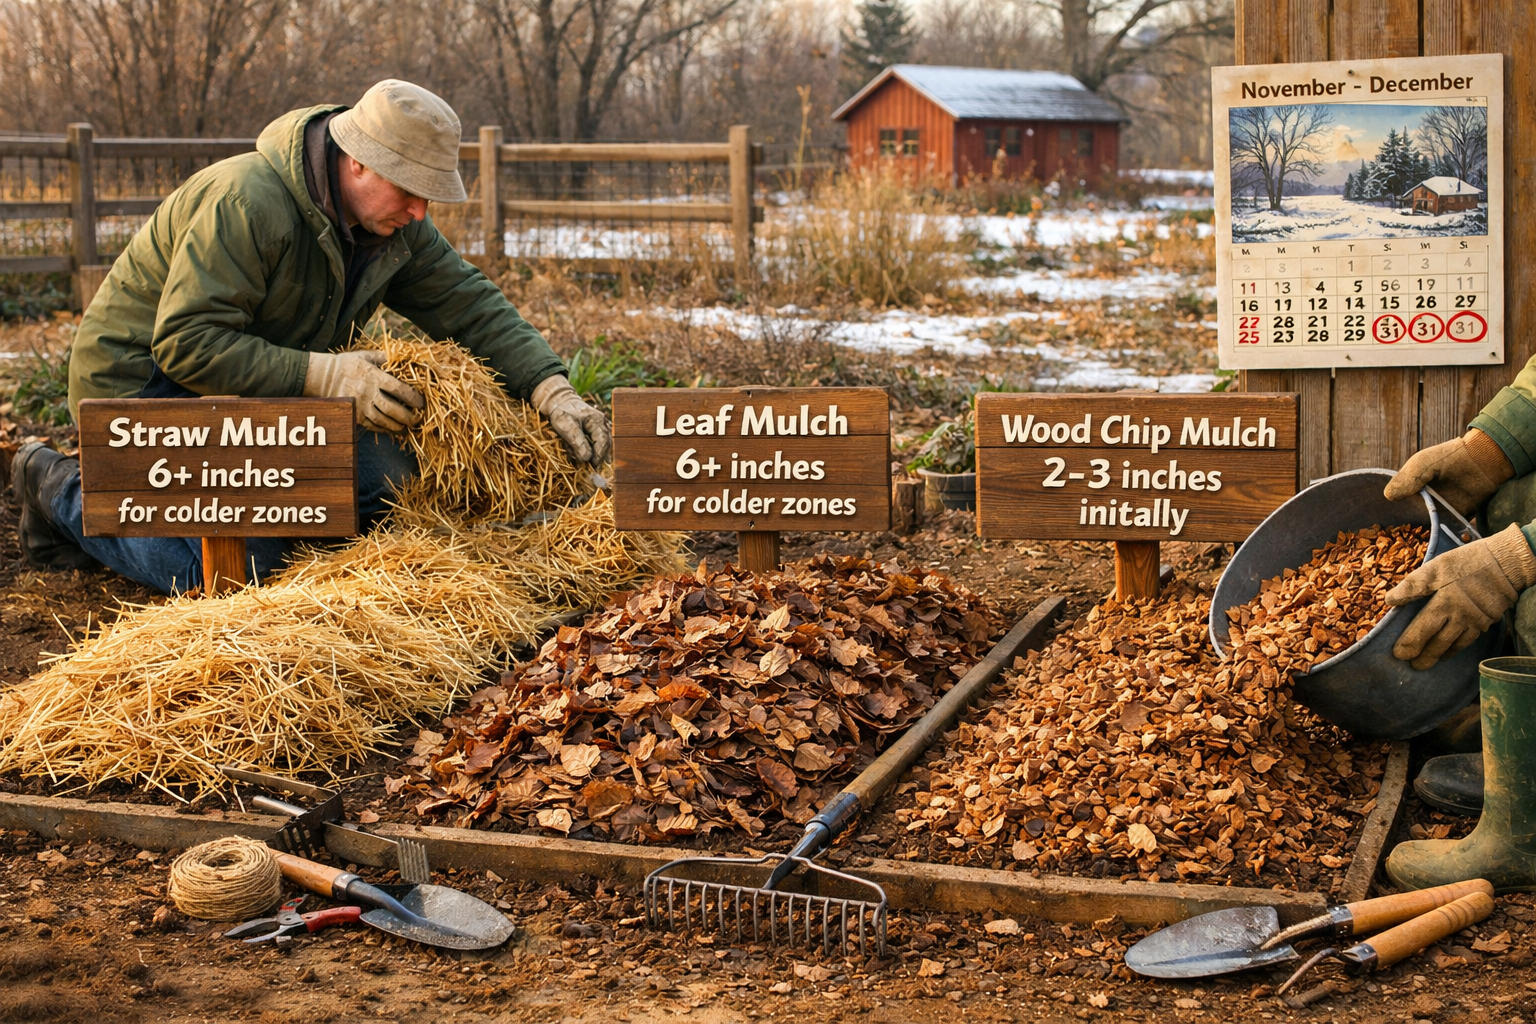
To overwinter vegetable garden beds with mulch, apply an initial light layer (2-3 inches) after clearing spent plants, then add a thicker layer (6-12 inches depending on your zone) after the ground freezes to provide insulation and protect the soil and any overwintering crops. The specific thickness and timing of mulch application are vital for effectiveness across different climate zones [1, 4].
Mulching is a cornerstone of overwintering, offering myriad benefits from weed suppression to moisture retention and temperature stabilization. It acts as a blanket, protecting the soil from harsh winter elements and preventing the drastic freeze-thaw cycles that can heave plants out of the ground in transitional zones.
Mulch Application by USDA Hardiness Zone:
- Zones 3-5 (Very Cold): In these frigid zones, a very thick layer of mulch, often 8-12 inches of straw, dried leaves, or wood chips, is essential. Apply a thin initial layer (2-3 inches) in late fall as temperatures drop, then add the bulk of the mulch after the ground has frozen solid. This prevents the soil from freezing too quickly before plants enter full dormancy but then keeps it frozen consistently, protecting roots from extreme cold and heaving [1, 4]. Some northern gardeners successfully leave root crops like carrots and parsnips in the ground under 10-12 inches of straw for winter harvesting [4].
- Zones 6-7 (Moderately Cold): A 4-6 inch layer of organic mulch is generally sufficient here. Apply after initial frosts, ensuring the soil has cooled but isn’t yet frozen solid. This helps retain soil warmth and moisture while protecting against fluctuating winter temperatures. You might consider using a mixture of leaf mold and straw to maximize organic matter.
- Zones 8-10 (Mild Winters): While deep freezing is less of a concern, mulching is still beneficial for weed suppression, moisture retention, and moderate temperature regulation. A 2-4 inch layer of compost, shredded leaves, or wood chips can improve soil structure and prevent winter annual weeds from germinating. You may even be able to grow some hardy cool-season crops through winter with minimal protection.
Choosing Your Mulch Material:
- Straw: Excellent for insulation, readily available, and breaks down relatively slowly [4].
- Dried Leaves: Free, abundant, and return valuable nutrients to the soil. Shredding them helps prevent matting and speeds decomposition.
- Wood Chips: Great for long-term beds, breaking down slowly, but can temporarily tie up nitrogen if tilled into the soil [1]. Best for pathways or permanent mulch layers.
- Compost: While also a soil amendment, a top layer of mature compost can act as light mulch while continuously feeding the soil.
When applying mulch, ensure it doesn’t pile directly against the stems of any overwintering perennial plants or small shrubs, as this can encourage rot or create habitat for rodents. For more on soil health, consider exploring our “Soil Basics for Container Gardening: 2026 Expert Guide” for related principles [https://minispacegarden.com/soil-basics-for-container-gardening/].
What Protective Structures Can I Use for Overwintering Vegetable Garden Beds?
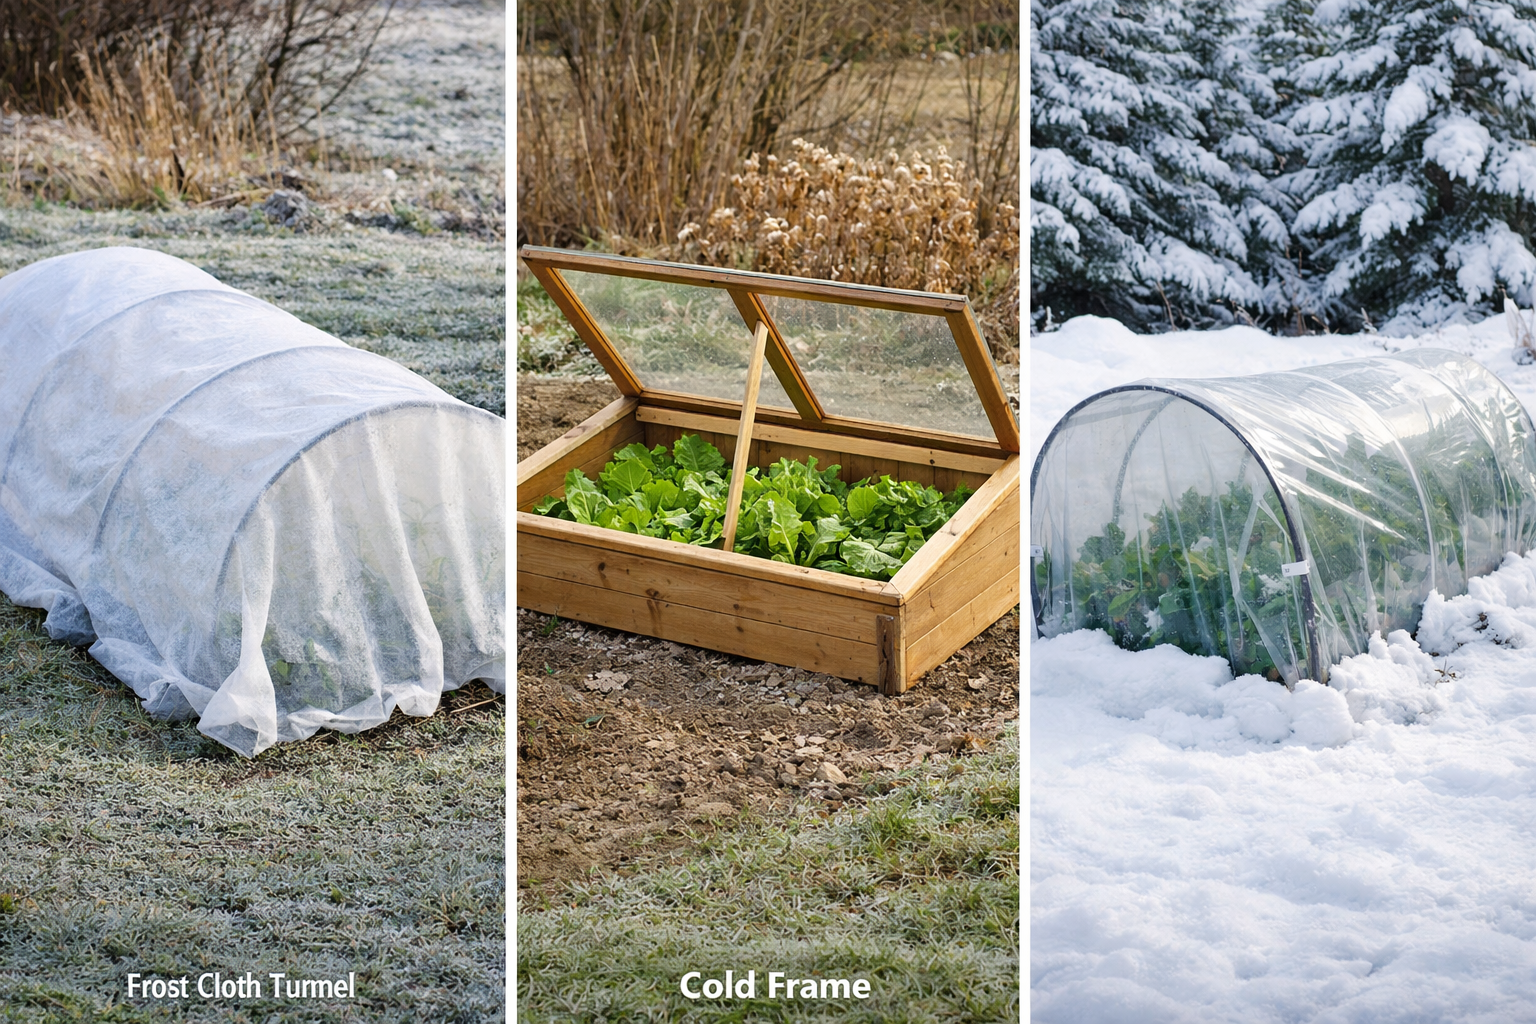
For overwintering vegetable garden beds, you can use various protective structures like frost cloth, cold frames, and hoop houses, which extend the growing season and shield plants from harsh winter conditions. These structures create microclimates that trap warmth and reduce wind exposure, allowing hardy crops to continue producing or survive dormancy [4].
The choice of protective structure depends on your climate zone, the crops you wish to overwinter, and your budget. Each option offers different levels of insulation and ease of use.
Types of Protective Structures:
Frost Cloth (Row Covers):
- Description: Lightweight, permeable fabric draped directly over plants or supported by hoops.
- Use: Ideal for temporary protection against light frosts, unexpected cold snaps, and pests. It can extend the fall harvest season and provide early spring protection [4].
- Zone Suitability: Universally useful across all zones, particularly in zones 6-10 for season extension, and as an initial layer in colder zones.
- Pros: Inexpensive, easy to deploy and remove, allows water and light through.
- Cons: Limited insulation, not suitable for extreme cold, can be cumbersome in windy conditions.
Cold Frames:
- Description: Bottomless boxes with clear glass or plastic tops that hinge open. They sit directly on the garden bed.
- Use: Excellent for overwintering hardy greens (kale, spinach, arugula, mustard) for winter harvesting, hardening off seedlings, and protecting smaller plants. Requires ventilation on sunny days to prevent overheating [4, 5].
- Zone Suitability: Best for zones 5-8 for continuous winter harvesting, and can aid survival in colder zones.
- Pros: Good insulation, protects against severe weather, relatively permanent, and easy to manage ventilation.
- Cons: Can be heavy, limited space, requires monitoring for heat buildup.
- Tip: Placing a layer of straw bales around the exterior of a cold frame can significantly boost its insulating properties.
Hoop Houses (Low Tunnels):
- Description: Simple structures made from flexible hoops (PVC or metal) covered with clear polyethylene sheeting or heavy-duty row cover fabric.
- Use: Provides significant wind protection and warmth for entire rows of vegetables. Portable versions can be moved between beds [4]. Some gardeners experiment with “double-wall” tunnels, using an inner layer of row cover and an outer layer of greenhouse film for enhanced insulation [5].
- Zone Suitability: Highly effective in zones 4-7 for extending the growing season well into winter and starting early in spring. Can provide critical protection in zones 3 for select hardy crops.
- Pros: Covers larger areas, relatively inexpensive to build, good wind resistance, significant temperature moderation.
- Cons: Can be more labor-intensive to set up, requires anchoring against wind, ventilation needs attention.
- Example: A low tunnel covered with thick poly sheeting can keep kale and collards alive and harvestable through many weeks of below-freezing temperatures in Zone 6.
When considering these structures, remember that managing moisture and ventilation is key to preventing fungal diseases. On warmer, sunny winter days, temporarily opening cold frames or lifting hoop house sides is often necessary to prevent overheating and allow air circulation. These structures are invaluable for anyone looking to maximize their garden’s productivity beyond the traditional growing season. For ideas on maximizing space, you might find our “Small Space Vegetable Gardening: 2026 Step-by-Step Guide” helpful [https://minispacegarden.com/small-space-vegetable-gardening/].
What are the Best Cover Crops for Overwintering and Soil Improvement?
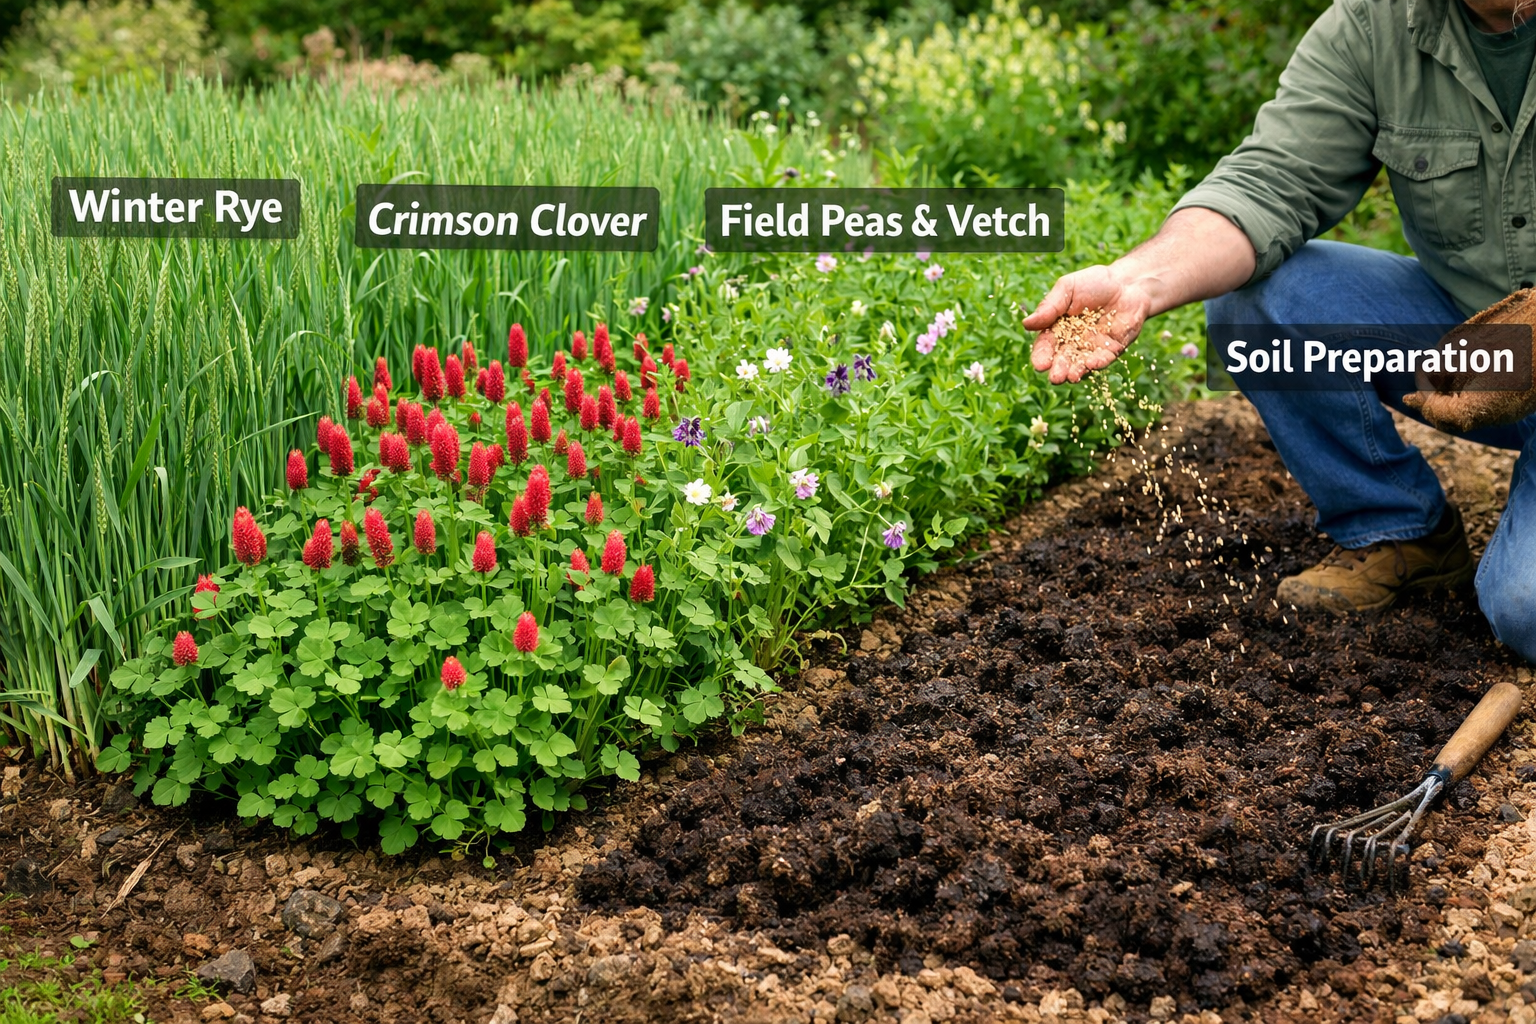
The best cover crops for overwintering and soil improvement are quick-growing varieties like winter rye, clover, field peas, and vetch, which should be planted 4-6 weeks before the first hard frost to establish themselves. These crops protect the soil from erosion, suppress weeds, add organic matter, and fix nitrogen, significantly enhancing bed fertility for the upcoming 2026 season [1].
Cover crops are a gardener’s secret weapon for building healthy soil and are especially valuable in overwintering strategies. Instead of leaving beds bare, a living cover crop actively contributes to the soil ecosystem.
Top Cover Crop Choices:
Winter Rye:
- Benefits: Extremely cold-hardy, excellent at preventing erosion, scavenging leftover nitrogen, and adding a substantial amount of organic matter when tilled under in spring [1]. It has a dense root system that improves soil structure.
- Best For: Zones 3-8. It’s one of the most reliable winter cover crops in colder climates.
- Management: Needs to be cut down or tilled under in early spring before it goes to seed and becomes too fibrous.
Clover (Crimson, White, or Red):
- Benefits: Nitrogen-fixing, meaning it pulls nitrogen from the air and makes it available in the soil. It also helps suppress weeds and attracts beneficial insects [1].
- Best For: Crimson clover (annual) for zones 6-9, red and white clover (perennial) for zones 3-7.
- Management: Can be cut back multiple times, allowing regrowth, or tilled under. Perennial clovers can be incorporated into pathways or no-dig beds.
Field Peas and Vetch (Hairy Vetch):
- Benefits: Both are excellent nitrogen-fixers and produce a good amount of biomass. Hairy vetch is particularly cold-hardy.
- Best For: Field peas for zones 6-9, hairy vetch for zones 4-8.
- Management: Often planted together or with a grain like oats or rye to provide a trellis for the vining habit of peas and vetch. Turn under in spring.
When and How to Plant Cover Crops:
- Timing: Plant 4-6 weeks before your average first hard frost date. This gives the seeds enough time to germinate and establish a root system before temperatures drop significantly [1].
- Preparation: Clear the bed of any remaining weeds or plant debris. Lightly loosen the top inch or two of soil if it’s compacted.
- Seeding: Broadcast the seeds evenly over the prepared bed. The seeding rate will vary by crop, so follow package directions.
- Covering: Lightly rake the soil to cover the seeds with about 1/4 to 1/2 inch of soil.
- Watering: Water thoroughly to encourage germination. Keep the soil consistently moist until seedlings emerge.
By selecting the right cover crop for your zone and planting it at the correct time, you can transform your garden beds into active nutrient factories, ensuring a vibrant and productive garden in 2026 without relying solely on external amendments.
How to Prepare Specific Perennial Vegetables and Fruits for Winter
Preparing specific perennial vegetables and fruits for winter involves tailored practices like pruning, mulching, and sometimes lifting, ensuring their survival and productivity for the following year. These plants, unlike annuals, are expected to return season after season, making their winter protection crucial.
Garlic
Garlic (Allium sativum) is a prime example of a crop that thrives with specific overwintering care.
- Planting: Plant individual garlic cloves 6 inches apart and 4 inches deep, root-side down, in well-drained soil during late fall (typically 4-6 weeks before the ground freezes) [1]. This timing allows for root development before dormancy.
- Mulching: Apply a light layer of mulch (2-3 inches of straw or shredded leaves) immediately after planting. Once the ground has frozen solid, add a heavier layer of mulch, up to 6-8 inches, especially in colder zones (zones 3-6) [1]. This prevents the soil from undergoing repeated freeze-thaw cycles, which can heave the cloves out of the ground.
- Protection: In extremely cold or exposed areas, an additional layer of row cover might be considered, though a thick mulch layer is usually sufficient.
Asparagus
Asparagus (Asparagus officinalis) crowns are hardy, but proper fall cleanup helps ensure future yields.
- Cleanup: After the foliage (ferns) yellows and dies back in late fall, cut them down to the ground. This helps prevent overwintering pests and diseases [1].
- Mulching: Apply a 4-6 inch layer of compost or well-rotted manure over the asparagus patch. This provides nutrients and light insulation. In colder zones, an additional layer of straw (4-6 inches) can be added on top of the compost for extra protection.
Rhubarb
Rhubarb (Rheum rhabarbarum) is very cold-hardy, but benefits from some fall attention.
- Cleanup: Remove any old, dead, or diseased leaves after the first hard frost.
- Mulching: Apply a 2-4 inch layer of compost or well-rotted manure around the base of the plants to replenish nutrients and offer mild insulation. No need for heavy mulching unless you are in zones 3 or colder, where an additional layer of leaves might be beneficial.
Berry Bushes (e.g., Raspberries, Blueberries)
- Pruning: Follow specific pruning guidelines for each berry type (e.g., prune fruiting canes of raspberries after harvest or in late winter) [1].
- Mulching: Apply a 4-6 inch layer of wood chips, pine needles, or shredded leaves around the base of the bushes. This helps regulate soil temperature, retain moisture, and suppress weeds. For blueberries, acidic mulches like pine needles are particularly beneficial.
- Protection (Colder Zones): In zones 3-5, some gardeners might gently bend raspberry canes to the ground and cover them with straw or burlap to protect them from extreme cold and wind dessication.
Caring for these perennials properly in the fall is an investment that pays dividends in spring with robust growth and bountiful harvests. For perennial plants in smaller spaces, consider our “Best Plants for Small Gardens 2026: The Complete List” for ideas on suitable varieties [https://minispacegarden.com/best-plants-for-small-space-gardens-complete-list/].
Common Mistakes to Avoid When Overwintering Vegetable Beds
When overwintering vegetable garden beds, several common mistakes can undermine your efforts, leading to depleted soil, pest issues, or damaged plants. Avoiding these pitfalls is crucial for a healthy garden in 2026 [1, 6].
- Leaving Beds Bare: The biggest mistake is simply doing nothing and leaving garden beds exposed. Bare soil is highly susceptible to erosion from wind and rain, nutrient leaching, and compaction, which degrade its structure and fertility [1].
- Solution: Always cover your beds with mulch, compost, or a cover crop.
- Applying Mulch Too Early or Too Thickly: While mulch is beneficial, applying a very thick layer before the ground truly freezes can insulate the soil too well, preventing it from reaching dormancy. This can encourage rodents to nest or allow diseases to fester in warm, moist conditions.
- Solution: Apply a lighter layer initially, then add the bulk of the mulch after the ground freezes in colder zones [1, 4].
- Not Clearing Diseased Plant Material: Leaving diseased plants or plant debris in the garden provides a perfect overwintering habitat for pathogens and pests. These issues will resurface with renewed vigor in the spring.
- Solution: Thoroughly remove all diseased plant material and dispose of it away from your compost pile (e.g., bag it for municipal waste) [1]. Healthy plant material can often be composted.
- Neglecting Soil Testing: Without knowing your soil’s current nutrient levels and pH, you might be adding amendments it doesn’t need or missing critical ones.
- Solution: Perform a soil test every few years to get an accurate picture of your soil’s health and inform your amendment choices.
- Over-Composting or Under-Composting: Adding too much undecomposed organic matter can temporarily tie up nitrogen, while not adding enough can leave soil nutrient-depleted.
- Solution: Use well-rotted compost. Aim for a 2-4 inch layer spread evenly over the bed, which will slowly break down over winter.
- Ignoring Weed Seeds: Letting weeds go to seed in late fall will create a massive weed problem for the following year.
- Solution: Stay vigilant with weeding right up until freezing temperatures, pulling weeds before they set seed. Cover crops can also help suppress winter weeds.
- Not Planning for Crop Rotation: Failing to rotate crops annually can lead to nutrient imbalances and the buildup of soil-borne pests and diseases specific to certain plant families.
- Solution: Use the winter downtime to plan your 2026 garden layout, ensuring you rotate crops to different beds each year [6].
By being mindful of these common missteps, you can ensure your overwintering efforts are effective and contribute to a healthier, more productive vegetable garden next season.
FAQ: Overwintering Vegetable Garden Beds
What does it mean to overwinter a vegetable garden bed?
Overwintering a vegetable garden bed means preparing it for the dormant winter months through practices like clearing debris, adding soil amendments, mulching, or planting cover crops to protect the soil, reduce pests, and ensure fertility for the next growing season.
Can I leave my vegetable garden bare over winter?
No, it’s generally not recommended to leave your vegetable garden bare over winter as this exposes the soil to erosion, nutrient leaching, and compaction, degrading its health and productivity for 2026 [1].
When should I start preparing my garden for winter?
You should start preparing your garden for winter in late fall, typically after the last harvest but before the first hard frost, often 4-6 weeks before the ground permanently freezes [1].
What is the purpose of a winter mulch layer?
The purpose of a winter mulch layer is to insulate the soil, protect plant roots from extreme cold and freeze-thaw cycles, conserve moisture, suppress weeds, and slowly add organic matter as it decomposes [4].
How thick should mulch be for overwintering?
The thickness of overwintering mulch depends on your climate zone: 2-3 inches initially, increasing to 4-8 inches in moderately cold zones, and up to 8-12 inches in very cold zones, applied after the ground freezes [1, 4].
Are cover crops better than mulch for overwintering?
Neither is inherently “better”; cover crops and mulch serve different but complementary functions. Cover crops actively enrich the soil and prevent erosion, while mulch primarily insulates and suppresses weeds. Many gardeners use both in different beds or stages [1].
Can I harvest vegetables from my garden during winter?
Yes, in milder zones or with protective structures like cold frames and hoop houses, you can harvest hardy vegetables such as kale, spinach, and carrots throughout the winter months [4, 5].
Do I need to water my overwintering garden beds?
Generally, overwintering garden beds do not require regular watering, especially once the ground freezes. However, if you are in a mild zone with a dry winter, occassional watering might be beneficial for any actively growing plants.
How do I prevent pests from overwintering in my garden beds?
To prevent pests from overwintering, thoroughly clean up all spent plant debris, especially diseased material, as this removes their hiding spots and food sources [1]. Rotating crops also helps disrupt pest cycles.
Should I turn my soil in the fall before winter?
Most modern gardening practices suggest minimizing tilling in the fall to preserve soil structure and microbial life. Instead, top-dress with compost or plant cover crops [6].
What is a cold frame used for in winter?
A cold frame is used in winter to extend the growing season for hardy greens, protect delicate plants, and start seeds earlier in spring by creating a warmer, sheltered microclimate [4, 5].
Conclusion
Successfully overwintering your vegetable garden beds is a fundamental practice that yields significant benefits for soil health, pest management, and overall garden productivity in 2026. By understanding how to overwinter vegetable garden beds (zone-specific), you empower your garden to regenerate, thrive, and provide bountiful harvests season after season. Whether you choose to blanket your beds with a thick layer of mulch, sow nutrient-building cover crops, or erect protective structures like cold frames and hoop houses, tailoring your approach to your specific USDA Hardiness Zone is key. This proactive care transforms the dormant winter months from a period of decline into a vital stage of preparation and renewal.
Actionable Next Steps:
- Identify Your Zone: Confirm your USDA Plant Hardiness Zone to guide your specific overwintering strategies.
- Clear & Clean: Thoroughly remove all spent annual plants and diseased debris from your garden beds.
- Amend Soil: Incorporate a 2-4 inch layer of good quality compost to enrich your soil for next season.
- Choose a Cover: Decide between mulching or planting cover crops based on your zone, goals, and available materials.
- If mulching: Apply an initial light layer, then a thicker layer once the ground freezes.
- If planting cover crops: Sow seeds 4-6 weeks before your first hard frost.
- Consider Protection: For colder zones or extended harvests, evaluate if frost cloth, cold frames, or hoop houses are appropriate for your garden needs.
- Plan for Spring: Use this downtime to sketch out your 2026 garden plan, including crop rotations, to hit the ground running when spring arrives.
References
[1] Prepare Vegetable Garden Winter – https://growagoodlife.com/prepare-vegetable-garden-winter/
[2] Overwintering – https://www.masterclass.com/articles/overwintering
[3] How To Design A Climate Resilient Vegetable Garden In 2026 – https://vegplotter.com/blog/how-to-design-a-climate-resilient-vegetable-garden-in-2026
[4] Overwintering Your Guide To Overwintering Plants And Crops – https://www.parkseed.com/blogs/park-seed-blog/overwintering-your-guide-to-overwintering-plants-and-crops
[5] Blanketing The Garden For A Long Winters Slumber – https://veggiegardeningtips.com/blanketing-the-garden-for-a-long-winters-slumber/
[6] How To Plan A Vegetable Garden In Winter For 2026 – https://www.timberlanegardens.com/blogs/garden-journal/how-to-plan-a-vegetable-garden-in-winter-for-2026
[7] Watch – https://www.youtube.com/watch?v=80vjoEw0cT8