How do I set up a Kratky hydroponics system in a mason jar for apartments?
Quick Answer: To set up a Kratky hydroponics system in a mason jar for apartments, you need a wide-mouth mason jar, a net cup that fits the lid, a growing medium like clay pebbles, a seedling, and a hydroponic nutrient solution. Fill the jar so the nutrient water just touches the bottom of the net cup, then place it near a light source and let the plant do the rest. No pump, no electricity, and no soil required.
Key Takeaways
- The Kratky method is a passive, no-pump hydroponics technique — ideal for apartments because it needs no electricity or plumbing.
- You need fewer than $20 in supplies to get started with one or two jars.
- Wide-mouth quart mason jars work best for herbs and leafy greens; wide-mouth half-gallon jars suit larger plants.
- The air gap between the water surface and the net cup bottom is critical — it allows roots to breathe.
- Lettuce, basil, spinach, mint, and cilantro are the easiest plants for beginners using this method.
- Nutrient solution pH should stay between 5.5 and 6.5 for best results.
- Wrap jars in dark tape or paper to block light and prevent algae growth.
- One refill of nutrient solution typically lasts a full grow cycle for leafy greens (3–6 weeks).
- This system works on windowsills, countertops, or under a simple grow light.
- Beginners can expect harvestable lettuce in as little as 3–4 weeks from transplanting a seedling.
What Is the Kratky Method and Why Is It Perfect for Apartments?
The Kratky method is a passive hydroponic technique developed by Dr. Bernard Kratky at the University of Hawaii. Plants grow in a net cup suspended over a reservoir of nutrient-rich water. As the plant drinks the water down, an air gap forms naturally — and that gap is where the roots get oxygen. No air pump, no water pump, no timer. Just a jar, some water, and nutrients.
For apartment dwellers, this is a practical win. You don’t need a balcony, a garden bed, or even much counter space. A single mason jar on a windowsill can grow enough basil to keep your kitchen stocked all season. If you’re already curious about indoor gardening for small homes and apartments, the Kratky mason jar setup is one of the lowest-barrier entry points available.
Choose this method if: you want fresh herbs or greens without the mess of soil, you have limited space, or you travel occasionally and can’t water plants daily.
What Supplies Do You Need to Set Up a Kratky Hydroponics System in a Mason Jar for Apartments?
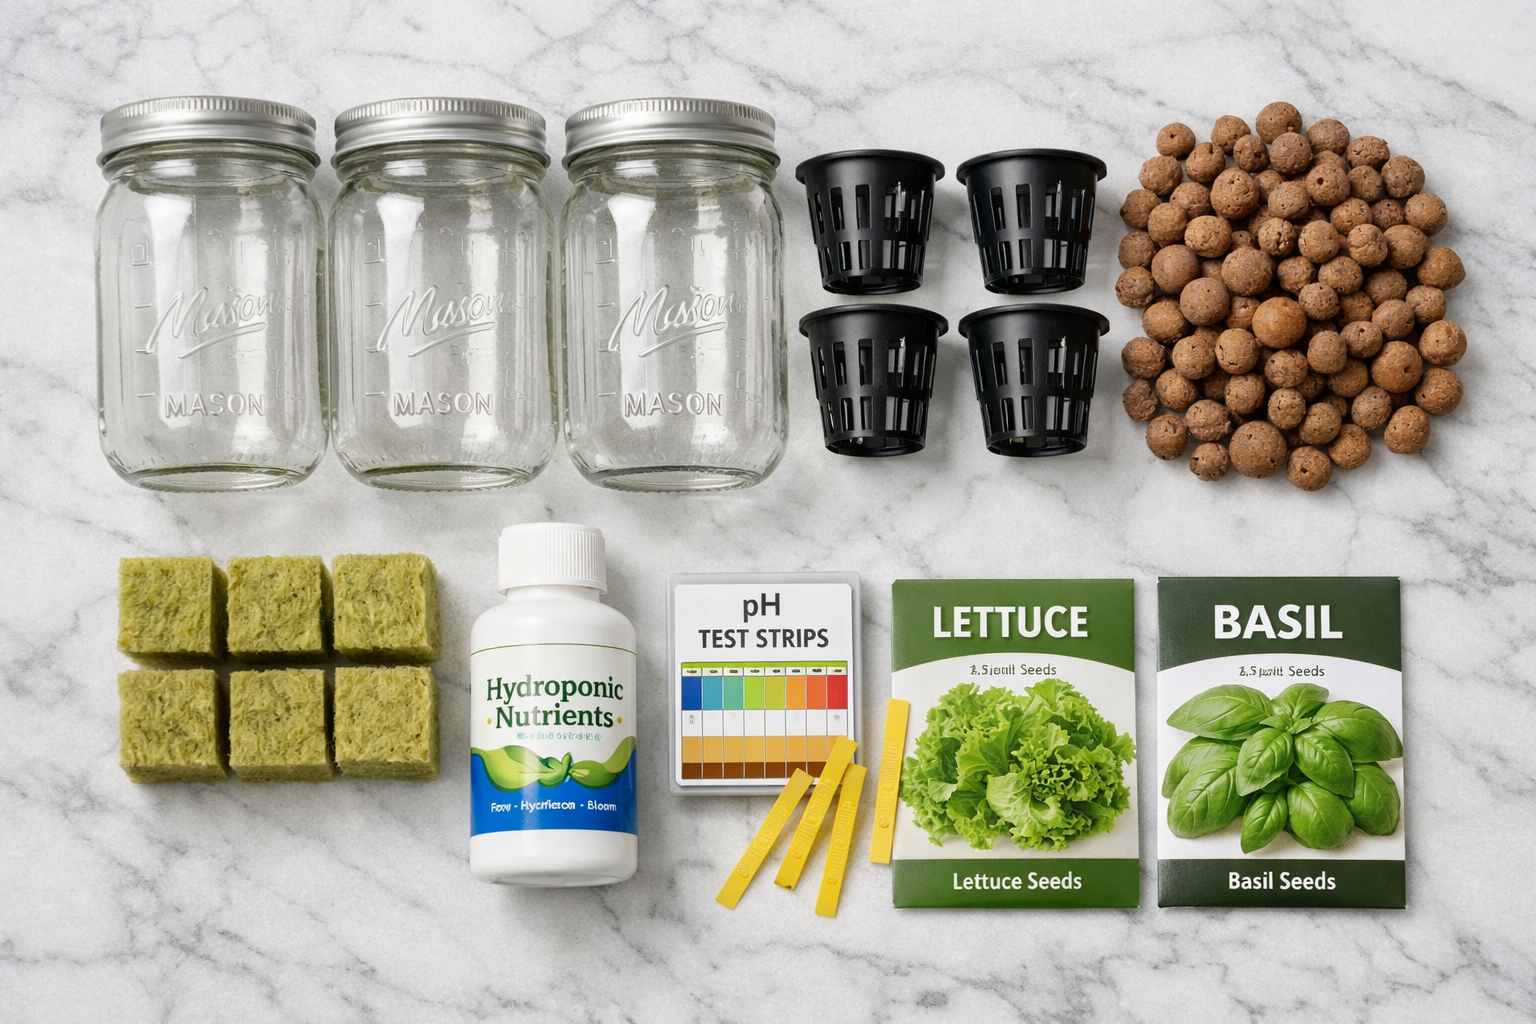
You need six core items. Most are available at hardware stores, garden centers, or online for under $20 total for a starter setup.
Optional but helpful:
- Black electrical tape or dark spray paint to cover the jar (blocks algae-causing light)
- A small grow light if your windowsill gets fewer than 6 hours of light daily
- A drill with a 2-inch hole saw bit to cut a clean hole in the mason jar lid
Pro tip: You can skip the drill by buying a pre-drilled mason jar lid insert sold specifically for Kratky setups. Search “mason jar net cup lid” and you’ll find them for about $1–$2 each.
Step-by-Step: How Do I Set Up a Kratky Hydroponics System in a Mason Jar for Apartments?
Here’s the full process from empty jar to growing plant. This takes about 15 minutes once you have your supplies.
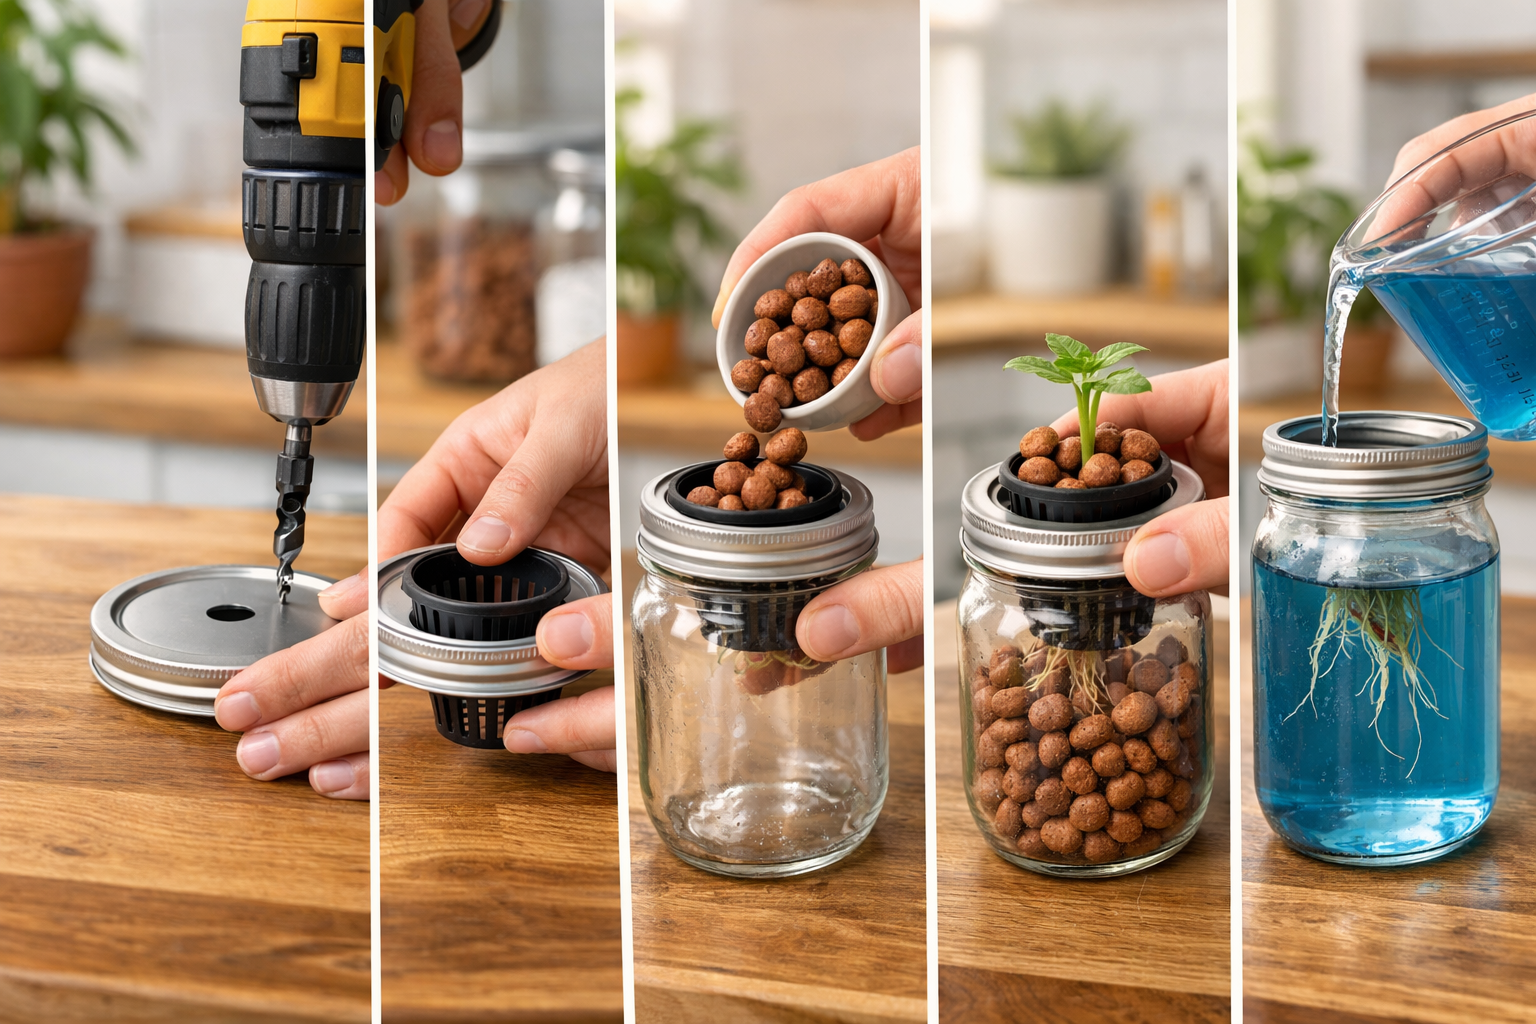
Step 1: Prepare the jar
Wash the mason jar with soap and rinse thoroughly. Wrap the outside with black electrical tape or dark paper, leaving the top inch uncovered so you can check the water level. This blocks light from reaching the nutrient solution, which prevents algae.
Step 2: Modify the lid
If your lid doesn’t already have a hole, drill a 2-inch hole in the center using a hole saw bit. The net cup should sit snugly in this hole without falling through.
Step 3: Mix your nutrient solution
Follow the instructions on your nutrient bottle. For most general-purpose hydroponic nutrients, this means mixing a small amount (usually 1–2 teaspoons) per gallon of water. Check the pH with your test kit and adjust it to land between 5.5 and 6.5. Tap water often sits around pH 7–8, so you may need a few drops of pH-down solution.
Step 4: Fill the jar
Pour the nutrient solution into the jar, leaving about 1–2 inches of space at the top. When you place the net cup in the lid, the bottom of the cup should just barely touch or sit about 1/4 inch above the water surface. This initial contact helps the seedling’s roots reach the water.
Step 5: Add your growing medium and plant
Rinse clay pebbles well before use. Fill the net cup about halfway with pebbles, place your seedling or rockwool cube containing a germinated seed in the center, then fill around it with more pebbles to hold it steady.
Step 6: Place the lid on the jar
Set the net cup lid onto the jar. The plant is now suspended above the nutrient solution. As the plant grows and drinks, the water level drops and an air gap forms — this is exactly what you want.
Step 7: Position near light
Place the jar on a windowsill that gets at least 6 hours of indirect or direct light daily. If your apartment doesn’t get enough natural light, a basic indoor grow light set 6–12 inches above the plant works well. Leafy greens and herbs don’t need intense light to thrive.
Which Plants Work Best in a Kratky Mason Jar Setup?
Leafy greens and soft herbs are the best candidates. They have modest root systems, grow quickly, and don’t need a large reservoir to complete their life cycle.
Best choices for beginners:
- Lettuce (any variety) — fastest results, ready in 3–4 weeks
- Basil — fragrant, productive, loves warmth
- Spinach — thrives in cooler indoor temps
- Cilantro — grows fast, harvest often
- Mint — vigorous grower; keep it in its own jar
Plants to avoid in a quart mason jar:
- Tomatoes, peppers, cucumbers — root systems too large; they need at least a 5-gallon bucket
- Root vegetables like carrots or radishes — incompatible with this method entirely
For more ideas on what grows well in small apartment spaces, see this guide to growing food in small spaces in the USA.
How Do I Maintain a Kratky Mason Jar System Week to Week?
Maintenance is minimal, which is one of the biggest advantages of this method.
Weekly checklist:
- Check water level through the uncovered top of the jar
- Top off with plain pH-adjusted water if the level drops significantly (don’t add more nutrients until the jar is nearly empty)
- Check for algae on any exposed surfaces — wipe clean if found
- Look at leaves for yellowing or spots (signs of nutrient imbalance)
- Rotate the jar a quarter turn if the plant is leaning toward the light
When to refill: For a full grow cycle of lettuce or basil, you typically refill the nutrient solution once or twice total. When the jar is almost empty, mix a fresh batch of nutrient solution and refill. For more on keeping indoor plants properly hydrated, the indoor watering guide covers the principles that apply here too.
Common mistake: Adding full-strength nutrient solution every time you top off. This causes nutrient buildup and can burn roots. Only use plain water for top-offs; save the full nutrient mix for when the jar is nearly empty.
What Are the Most Common Problems and How Do I Fix Them?
Even a simple system has a few failure points. Here’s what to watch for:
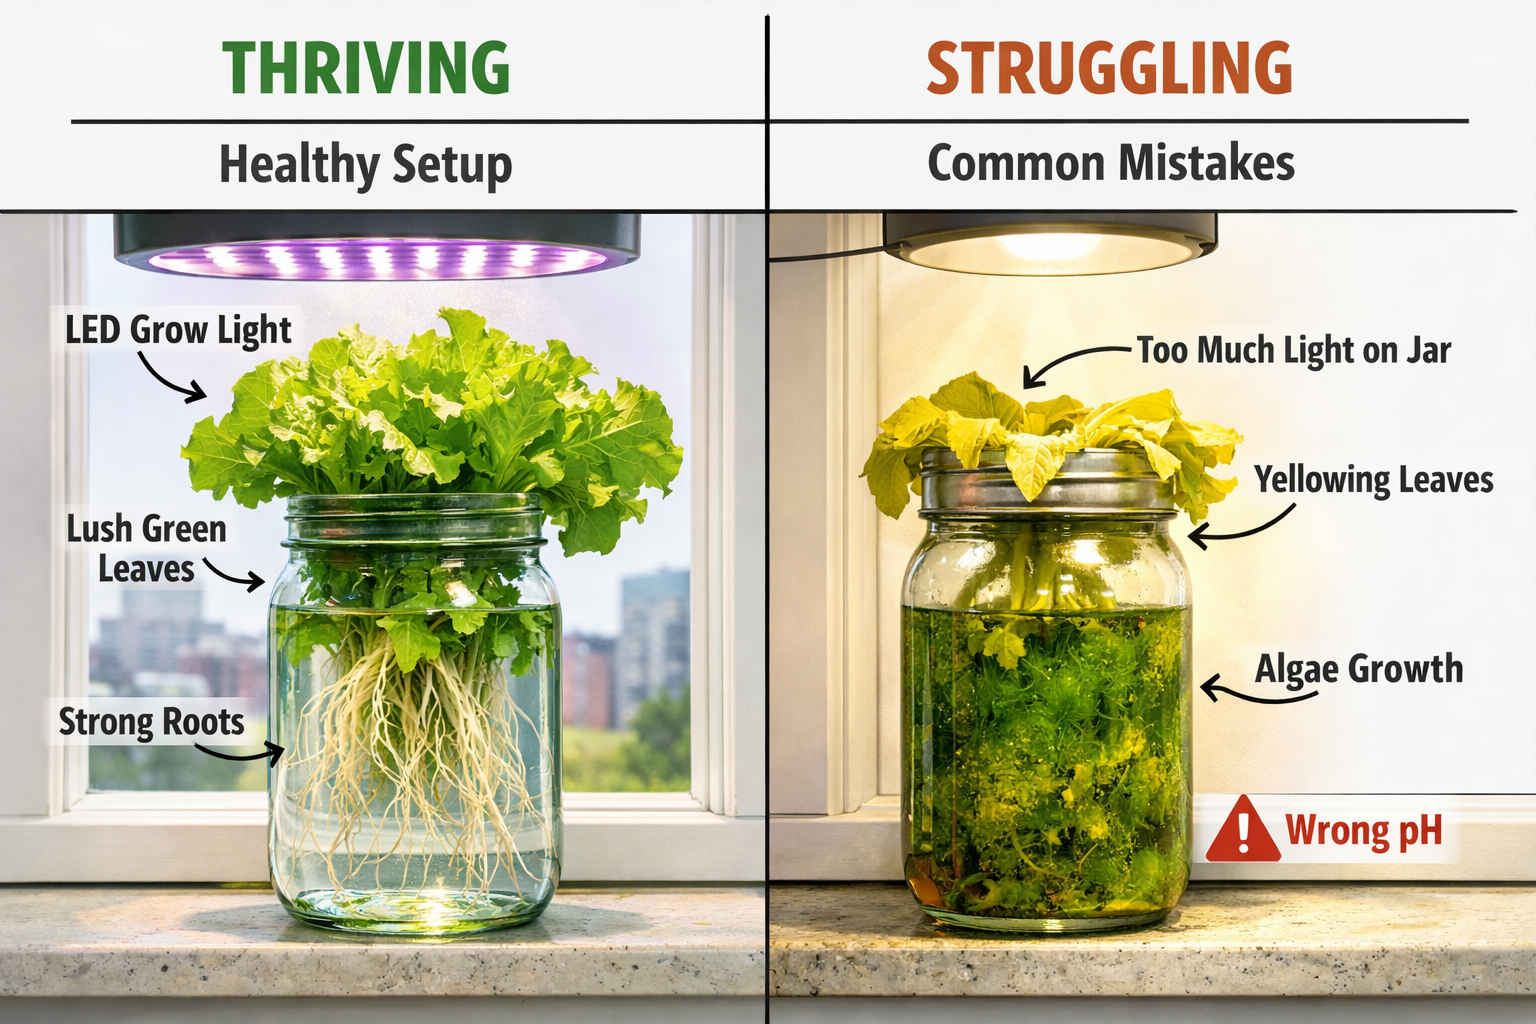
Algae growth (green slime on jar or roots)
Caused by light hitting the nutrient solution. Fix: cover the jar completely with dark tape or wrap it in aluminum foil. Algae won’t kill the plant immediately, but it competes for nutrients and oxygen.
Yellow leaves
Usually means the nutrient solution pH is off, or the plant has exhausted the nutrients. Check pH first. If it’s outside the 5.5–6.5 range, drain and replace with fresh, properly pH-adjusted solution. For more on diagnosing leaf problems, see our guide on common indoor gardening mistakes.
Plant wilting despite full jar
The roots may be sitting in water with no air gap, causing root rot. This happens if you overfill the jar. Drain some water so the bottom of the net cup sits above the waterline by at least 1/4 inch.
Slow or no growth
Most often a light problem. Lettuce and basil need 12–16 hours of light per day under artificial lighting, or a bright south-facing window. If your apartment has low natural light, check out options for indoor gardening without sunlight.
How Much Does a Kratky Mason Jar Setup Cost to Run?
The startup cost for a single jar is roughly $15–$25 if you buy everything new. A bag of clay pebbles and a bottle of nutrients will supply 10–20 jars, so the cost per jar drops sharply after your first setup.
Ongoing costs are nearly zero. The nutrient solution for one quart jar costs pennies per grow cycle. If you use a grow light, a small LED panel (10–20 watts) adds a few cents per day to your electricity bill.
Compared to buying fresh herbs at a grocery store (often $2–$4 per bunch), a single basil plant in a Kratky jar can pay for itself within one or two harvests. For more budget-conscious growing ideas, see this budget small-space gardening setup guide.
FAQ
Q: Do I need a special mason jar for Kratky hydroponics?
A wide-mouth mason jar works best because the opening is large enough to fit a standard 2-inch net cup. Regular-mouth jars are too narrow for most net cups.
Q: Can I start seeds directly in the Kratky jar?
Yes, but it’s easier to germinate seeds in a rockwool cube first, then transfer the cube (with sprouted seedling) into the net cup. Direct seeding in the jar works but takes longer and has lower success rates for beginners.
Q: How often do I change the nutrient solution?
For a full grow cycle (3–6 weeks for leafy greens), you typically don’t need to fully change it. Top off with plain water as the level drops, and replace with fresh nutrient solution only when the jar is nearly empty.
Q: What pH should the water be?
Keep pH between 5.5 and 6.5. Most tap water is too alkaline (pH 7–8), so you’ll likely need a few drops of pH-down solution. Test with strips or a digital meter.
Q: Will the roots rot if they sit in water?
Root rot happens when roots have no oxygen. The Kratky method prevents this by allowing an air gap to form naturally as the plant drinks the water down. As long as you don’t overfill the jar, the roots above the waterline get the air they need.
Q: Can I reuse the mason jar and net cup?
Yes. After harvest, rinse everything with a diluted hydrogen peroxide solution (3% hydrogen peroxide mixed 1:1 with water), let it dry, and set it up again with fresh nutrients and a new seedling.
Q: How much light does a Kratky jar need?
Leafy greens and herbs need 12–16 hours of light under grow lights, or a bright south- or west-facing window. A simple LED grow light works fine if natural light is limited.
Q: Is the Kratky method safe for apartment renters?
Completely. There’s no plumbing involved, no risk of flooding (a sealed jar holds the water), and no soil to spill. It’s one of the most renter-friendly gardening methods available.
Conclusion
Setting up a Kratky hydroponics system in a mason jar is one of the most accessible ways to grow fresh food in an apartment. You need a jar, a net cup, some clay pebbles, nutrient solution, and a seedling — and you can have harvestable greens in three to four weeks with almost no ongoing effort.
Your next steps:
- Pick up supplies — a wide-mouth quart mason jar, a 2-inch net cup, and a small bottle of hydroponic nutrients are all you need to start.
- Choose your first plant — lettuce or basil are the most forgiving for first-timers.
- Set up your light source — check your windowsill first; add a basic LED grow light if needed.
- Mix your nutrient solution, check the pH, and fill the jar — then place your seedling and wait.
Once you’ve grown one successful jar, scaling to a small countertop setup with four or five jars is straightforward. For more ideas on making the most of your apartment’s growing potential, explore our full guide to apartment gardening ideas for 2026 and the indoor herb garden setup guide.
References
- Kratky, B.A. (2009). A Suspended Net-pot, Non-circulating Hydroponic Method for Commercial Production of Lettuce. University of Hawaii at Manoa, College of Tropical Agriculture and Human Resources. Proceedings of the International Symposium on Soilless Culture and Hydroponics.
- University of Hawaii Cooperative Extension Service. (2010). Three Non-Circulating Hydroponic Methods for Growing Lettuce. Hort Technology, 20(4).