Growing Spinach in Containers: 2026 Expert Guide
Bringing fresh, nutritious spinach to your kitchen can be remarkably simple, even if you lack a traditional garden space. Growing spinach in containers is an excellent solution for urban gardeners, small balconies, or anyone looking to maximize their harvest in limited areas. This guide will walk you through everything you need to know to cultivate a thriving crop of spinach right from your patio or windowsill in 2026.
Key Takeaways
- Spinach thrives in containers with proper drainage and at least 6-8 inches of depth.
- A custom soil blend (60% potting mix, 30% compost, 10% perlite) enhances growth and yield.
- Spinach is a cool-season crop, performing best in temperatures between 15-20°C (60-70°F) and requiring 4-6 hours of daily sunlight.
- Harvesting begins 30-45 days from seeding, with leaves ready when 3-4 inches long.
- Consistent watering and balanced feeding are crucial for healthy, continuous production.
- Rotate containers or refresh soil to prevent nutrient depletion and pest issues.
- Fresh-picked container spinach can offer higher nutritional content than store-bought varieties.
Quick Answer
Growing spinach in containers is highly effective for small spaces, requiring well-draining pots at least 6-8 inches deep, a rich potting mix, and 4-6 hours of daily sunlight in cool conditions. Seeds germinate readily, with leaves ready for harvest within 30-45 days, providing a continuous supply of fresh greens through cut-and-come-again methods.
What Are the Best Containers for Growing Spinach?
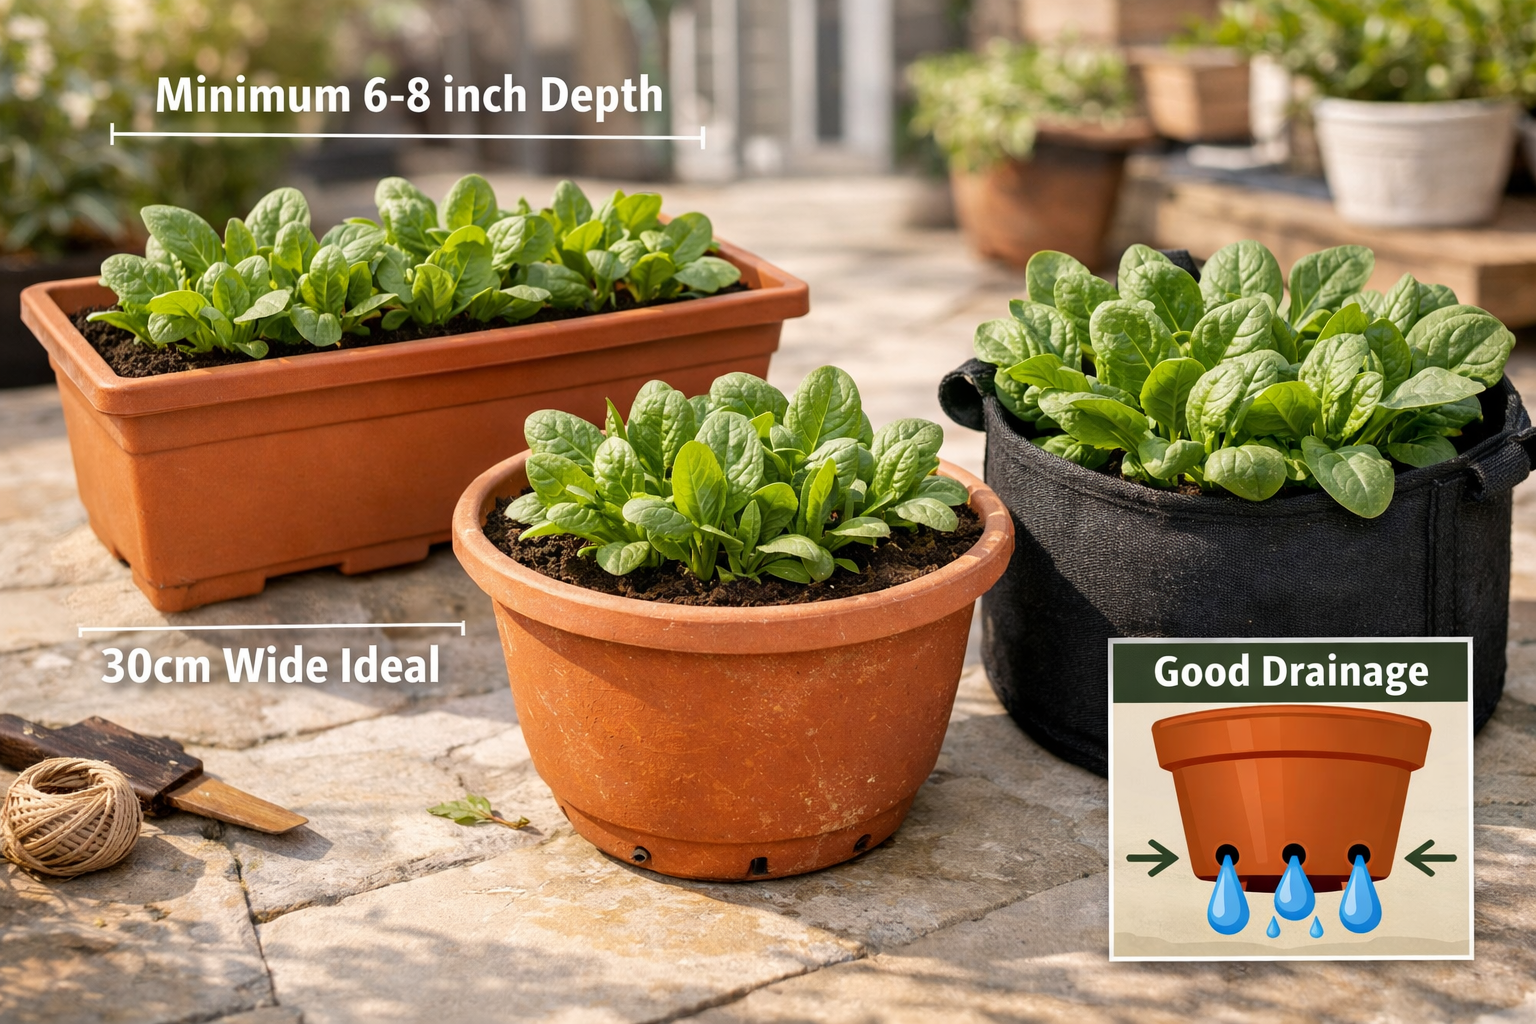
The best containers for growing spinach provide adequate space for root development and excellent drainage to prevent waterlogging. Choose pots that are at least 6-8 inches deep and about 30cm (approximately 1 foot) wide to allow for optimal growth [1, 3].
Spinach roots need room to establish without becoming constricted, and shallow containers can lead to stunted growth. Containers at least 30cm wide and deep are ideal, accommodating multiple plants and promoting robust root systems [1, 3]. Materials like terracotta, plastic, or fabric grow bags all work well, provided they have sufficient drainage holes. For instance, terracotta pots offer good aeration and can help regulate soil temperature, while plastic pots retain moisture longer, which can be beneficial in hotter climates. Fabric grow bags are excellent for preventing root circling and ensuring superior drainage. According to Cornell University studies, waterlogged roots due to poor drainage are a primary cause of container spinach failure, accounting for 70% of crop losses [1]. Therefore, always ensure your chosen container has multiple drainage holes at the bottom. For those looking to maximize space, consider vertical gardening options or window boxes to make the most of your available area.
Container Sizing and Material Guide
| Container Type | Minimum Depth (inches) | Minimum Width (inches/cm) | Advantages | Considerations |
|---|---|---|---|---|
| Terracotta | 6-8 | 12 / 30cm | Good aeration, regulates temperature | Dries out faster, can be heavy |
| Plastic | 6-8 | 12 / 30cm | Retains moisture, lightweight, durable | Less aeration, can overheat in direct sun |
| Fabric Grow Bag | 6-8 | 12 / 30cm | Excellent drainage, root aeration, portable | Dries out quicker, may degrade over time |
| Window Box | 6-8 | 6-8 (per plant) | Space-efficient for narrow areas | May require more frequent watering |
| Recycled Buckets | 8+ | 12+ / 30cm+ | Cost-effective, often deep enough | Must drill ample drainage holes, less aesthetic |
Decision Rule: If you prioritize ease of watering and moisture retention, choose plastic. If you’re concerned about root rot and prefer natural materials, opt for terracotta or fabric bags, understanding they may need more frequent watering. Regardless of the material, proper drainage is non-negotiable.
What is the Best Soil and Planting Method for Growing Spinach in Containers?
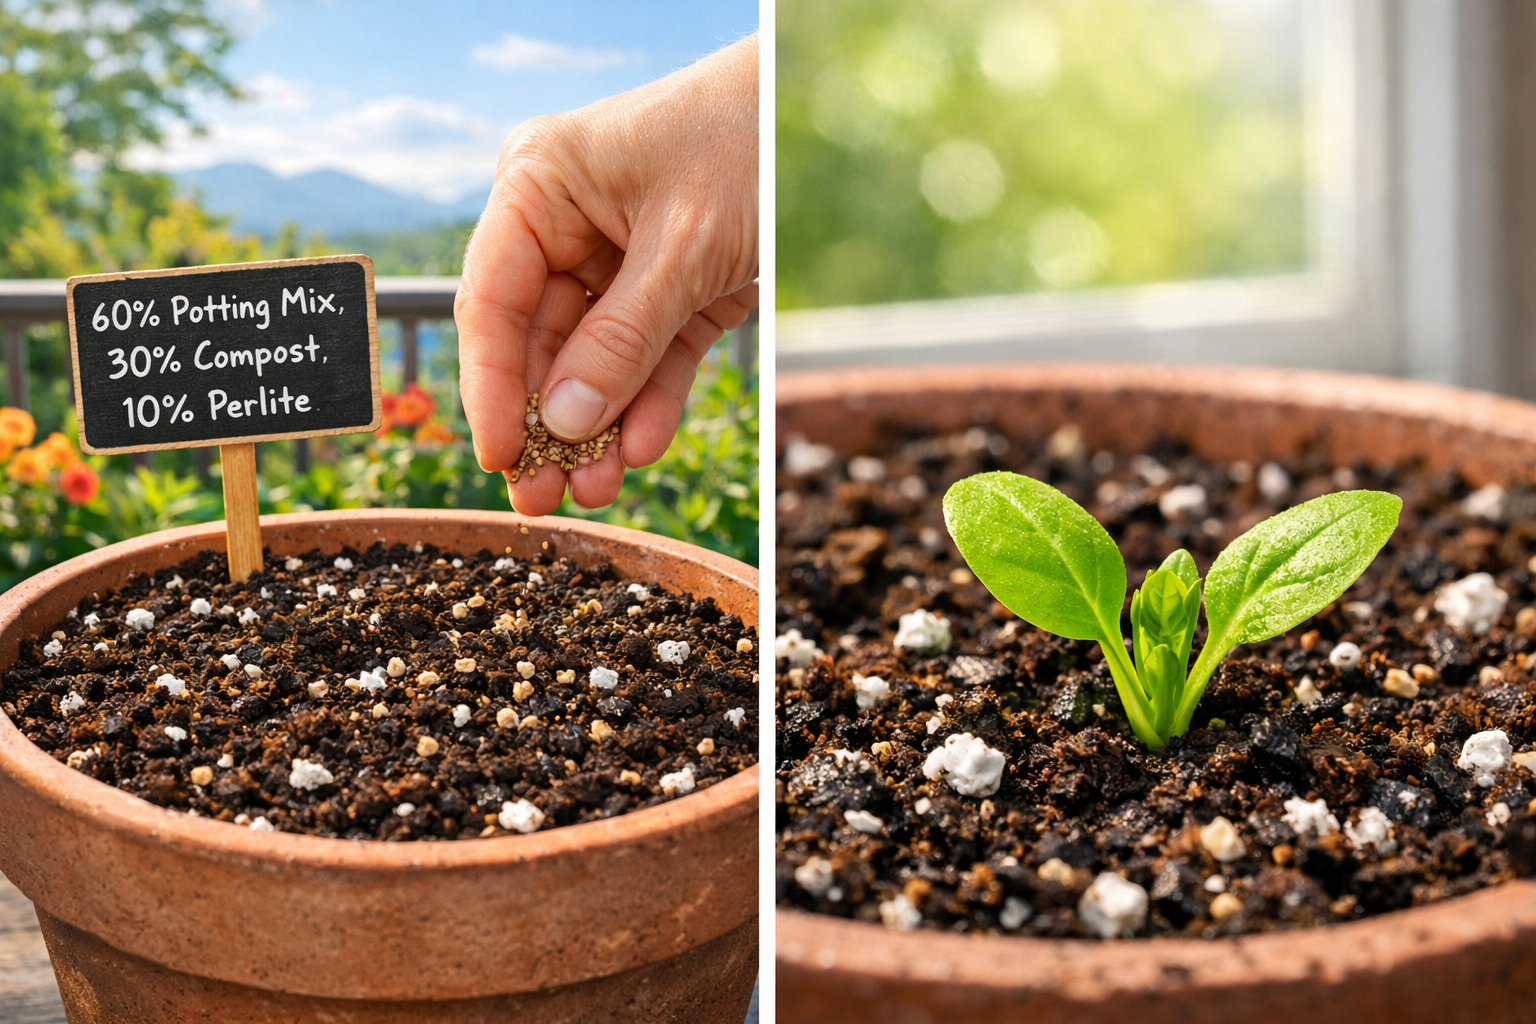
The best soil for growing spinach in containers is a rich, well-draining blend that provides ample nutrients and moisture retention. A custom mix of 60% premium potting mix, 30% compost, and 10% perlite significantly improves yield compared to standard potting mix alone [1].
This custom blend ensures good aeration (from perlite), essential nutrients (from compost), and a stable structure (from potting mix). For successful container gardening, fill your chosen container to about an inch below the rim with this mix.
Step-by-Step Planting Guide
- Prepare the Container: Ensure your container has adequate drainage holes. Place a layer of landscape fabric or a coffee filter over the holes to prevent soil from washing out while still allowing water to drain.
- Add Soil Mix: Fill the container with your custom soil blend, leaving about 1 inch of space from the rim. Gently pat down the soil but avoid compacting it too much. For more on soil fundamentals, refer to our “Soil Basics for Container Gardening: 2026 Expert Guide” [https://minispacegarden.com/soil-basics-for-container-gardening/].
- Sow Seeds: Spinach seeds can be sown directly into the prepared soil. Plant seeds about ½ inch deep and 2-4 inches apart for larger varieties, or closer (1-2 inches) for baby spinach harvests [4]. Alternatively, you can sow seeds more densely and thin them out later.
- Cover and Water: Lightly cover the seeds with a thin layer of soil mix. Gently water the container until moisture drains from the bottom.
- Germination: Keep the soil consistently moist. Spinach seeds typically germinate at soil temperatures between 50-80°F (10-27°C), but germination is also possible below 40°F [4]. You should see sprouts within 7-14 days [1].
- Thinning (Optional): Once seedlings have developed their first true leaves, thin them to the recommended spacing (2-4 inches apart) to ensure each plant has enough room to grow. You can snip off weaker seedlings at the soil line to avoid disturbing the roots of stronger plants.
Common Mistake: Using garden soil directly in containers is a frequent error. Garden soil compacts easily, lacks adequate drainage, and can introduce pests or diseases, leading to poor spinach growth. Always opt for a high-quality potting mix designed for containers.
How Much Sunlight and Water Do Container Spinach Plants Need?
Container spinach plants require 4-6 hours of daily direct sunlight to thrive, or 14-16 hours under LED grow lights at a 5000K color temperature for indoor cultivation [1]. Consistent moisture is also crucial, as spinach prefers evenly moist soil but despises waterlogging.
Spinach is a cool-season crop, meaning it performs best in cooler temperatures, ideally between 15-20°C (60-70°F) [3]. While it needs adequate light, intense summer heat can cause it to bolt (flower prematurely), making the leaves bitter [1, 5]. Therefore, placement is key. If growing outdoors during warmer periods, provide afternoon shade to protect plants from scorching sun. For indoor growers, placing pots near a bright window or using supplemental grow lights ensures sufficient light without the risk of heat stress.
Watering and Temperature Management
- Watering Frequency: Check the soil moisture daily by sticking your finger about an inch deep. If it feels dry, it’s time to water. Water thoroughly until you see water draining from the bottom of the pot. In warm or windy conditions, container plants dry out faster than in-ground gardens and may need watering twice a day. For guidance on plant hydration, consult our “How Often Should You Water Plants? Ultimate Guide 2026” [https://minispacegarden.com/how-often-should-you-water-plants/].
- Avoid Overwatering: While consistent moisture is important, overwatering leads to soggy soil, which suffocates roots and is a major cause of spinach plant death [1]. Ensure good drainage and never let pots sit in standing water.
- Temperature Control: Spinach is sensitive to heat. During unseasonably warm spells, move containers to shadier spots or provide temporary shade. For indoor setups, maintain room temperatures within the ideal 60-70°F (15-20°C) range.
Edge Case: If you live in an area with particularly hot summers, consider growing spinach as a spring or fall crop to avoid bolting. You can also opt for heat-tolerant spinach varieties, although these often have slightly different textures or flavors than traditional spinach.
How and When Should I Harvest Spinach from My Containers?
You can start harvesting spinach leaves from your containers approximately 30-45 days after planting seeds, once the leaves reach 3-4 inches long [1, 2]. The “cut-and-come-again” method is best for continuous harvests.
This method involves picking only the outer, mature leaves, allowing the inner leaves to continue growing and producing. This extends your harvest window, providing fresh spinach for weeks. Spinach begins its leaf development phase around days 8-21 after germination, with the first harvest possible from day 22 [1]. Peak production, with harvests every 3-4 days, typically occurs between days 31-45 [1].
Harvesting Techniques for Continuous Yield
- Identify Ready Leaves: Look for outer leaves that are at least 3-4 inches long, vibrant green, and firm [2]. Avoid harvesting all leaves from a single plant at once.
- Cut Outer Leaves: Using clean scissors or your fingers, snip or pinch off the outer leaves at the base of the plant, leaving the central growth point (the crown) intact. This encourages new growth from the center [2].
- Harvest Regularly: Harvesting every 3-4 days during peak production encourages the plant to produce more leaves [1].
- Best Time to Harvest: Harvest in the early morning after the dew has dried but before the sun gets too hot. UC Davis studies indicate that harvesting during peak heat increases bitterness by 37% [1].
- Don’t Let it Bolt: If you see a central stalk starting to grow taller with tiny buds—this is the plant bolting to seed—harvest all remaining leaves immediately, as they will quickly become bitter.
Quick Example: On day 35, I might harvest a handful of outer leaves from my 3-4 spinach plants in a single container. By day 38, new inner leaves have expanded, allowing for another small harvest. This sustained approach provides a steady supply of fresh greens, which, according to University of Minnesota Extension research, can contain up to 30% more folate and iron than store-bought spinach [1].
What Are Common Problems and Solutions for Growing Spinach in Containers?
Common problems when growing spinach in containers include bolting, pest infestations, and nutrient deficiencies, all of which can be addressed with proper care and attention. Bolting (premature flowering) is often caused by high temperatures or long daylight hours, while pests and nutrient issues stem from environmental factors and soil health.
Spinach is generally a hardy plant, but container growing presents specific challenges due to limited soil volume and exposure. Recognizing these issues early is key to maintaining a healthy harvest.
Troubleshooting Guide for Container Spinach
- Bolting (Spinach goes to seed):
- Problem: Leaves become bitter, and a central stalk emerges.
- Cause: High temperatures (above 24°C/75°F), excessive daylight hours, or plant stress [1, 5].
- Solution: Plant spinach as a cool-season crop (spring or fall). Provide afternoon shade during warmer months. Harvest regularly to encourage vegetative growth. Choose bolt-resistant varieties if available.
- Pest Infestations (Aphids, Leaf Miners):
- Problem: Small insects visible on leaves, chewed holes, or tunneling within leaves.
- Cause: Pests are attracted to tender new growth.
- Solution: Regularly inspect plants. For aphids, spray with a strong stream of water or use insecticidal soap. For leaf miners, remove affected leaves and destroy them. Consider companion planting with marigolds or chives to deter pests naturally. Rotate your crops if you’re reusing containers.
- Nutrient Deficiencies (Yellowing Leaves, Stunted Growth):
- Problem: Leaves turn pale, yellow, or plants don’t grow well.
- Cause: Lack of essential nutrients in the soil or overwatering.
- Solution: Use a rich potting mix with compost. Fertilize every 2-3 weeks with a balanced liquid organic fertilizer, such as fish emulsion, especially after significant harvests. Southeast Asian field tests indicate spinach fed with organic fertilizers like fish emulsion contains 22% more magnesium [1]. Ensure proper drainage to prevent root rot, which inhibits nutrient uptake.
- Fungal Diseases (Downy Mildew):
- Problem: Yellow spots on the upper leaf surface, grey fuzzy growth on the underside.
- Cause: High humidity and poor air circulation.
- Solution: Ensure good air circulation around plants. Avoid overhead watering, instead water at the base of the plant. Remove and destroy infected leaves immediately. Consider rust-resistant spinach varieties.
Quick Tip: If you’re consistently facing issues with pests or diseases, completely refresh the soil in your containers each season. This helps break pest cycles and replenishes nutrients. You might also want to read about “Beginner Mistakes in Small Space Gardening 2026” [https://minispacegarden.com/beginner-mistakes-in-small-space-gardening/].
Why Grow Spinach in Containers Instead of the Ground?
Growing spinach in containers offers significant advantages over in-ground gardening, primarily providing flexibility, better control over growing conditions, and suitability for small spaces. For urban dwellers or those with limited yard access, containers are often the only viable option.
Container gardening allows you to precisely manage soil composition, nutrient levels, and moisture, which can lead to healthier plants and more predictable yields. The mobility of containers also means you can easily move plants to optimize sunlight exposure or protect them from harsh weather conditions.
Container vs. In-Ground Spinach: A Comparison
| Feature | Container Gardening | In-Ground Gardening |
|---|---|---|
| Space | Ideal for small spaces, balconies, patios [6] | Requires dedicated garden beds or yard space |
| Mobility | Easily moved to optimize light/shade or avoid frost | Fixed location, less adaptable to changing conditions |
| Soil Control | Full control over soil mix, drainage, and nutrients | Dependent on existing garden soil, amendments may be needed |
| Pest Control | Easier to isolate and treat individual plants, fewer soil-borne pests | More susceptible to widespread pest infestations and soil diseases |
| Weed Control | Minimal to no weeds | Requires regular weeding |
| Watering | Dries out faster, may need more frequent watering | Soil retains moisture longer, less frequent watering |
| Yield | Smaller scale, but continuous harvests from multiple plants | Potentially larger overall yield, but less flexibility |
| Accessibility | Accessible for all mobility levels | May require bending or kneeling |
Decision Rule: Choose container gardening if you have limited space, desire flexibility, or want precise control over your plant’s environment. Opt for in-ground gardening if you have ample space, prefer less frequent watering, and are prepared for more extensive pest and weed management. Spinach is also among the “Easy Plants to Grow in Small Spaces (2026 Guide)” [https://minispacegarden.com/easy-plants-to-grow-in-small-spaces/].
Conclusion
Growing spinach in containers is an incredibly rewarding and practical endeavor for any home gardener, regardless of space limitations. By selecting the right containers with excellent drainage, preparing a nutrient-rich soil mix, and providing consistent care regarding sunlight and water, you can enjoy a continuous harvest of fresh, highly nutritious spinach. Remember that spinach thrives in cool conditions and benefits from the cut-and-come-again harvesting method.
Embrace the flexibility and control that container gardening offers, and don’t be afraid to experiment with different varieties and container types. With a little effort, your 2026 garden can provide a bounty of homegrown spinach, enhancing your meals and your gardening satisfaction.
References
[1] Planting Spinach In Containers – https://spice.alibaba.com/spice-basics/planting-spinach-in-containers
[2] Splendid Spinach Containers – https://ucanr.edu/site/uc-master-gardener-program-alameda-county/splendid-spinach-containers
[3] Grow Your Own – https://www.rhs.org.uk/vegetables/spinach/grow-your-own
[4] How To Grow Spinach In Pots – https://ecogardener.com/blogs/news/how-to-grow-spinach-in-pots
[5] Growing Spinach A Cool Season Vegetable – https://extension.psu.edu/growing-spinach-a-cool-season-vegetable/
[6] Watch – https://www.youtube.com/watch?v=kLuqqak4xx0
FAQ
How deep do spinach roots grow in containers?
Spinach roots typically require a minimum of 6-8 inches of soil depth to develop properly in containers, though deeper pots are always beneficial [1].
Can I grow spinach indoors in containers?
Yes, you can grow spinach indoors in containers provided it receives 14-16 hours of daily light, ideally from a 5000K LED grow light, and is kept in a cool environment [1].
How long does it take to grow spinach in a pot?
Spinach is ready for its first harvest in pots within 30-45 days from seeding, with continuous production possible thereafter [1].
How many spinach plants can I grow in one container?
In a container approximately 12 inches (30cm) wide and deep, you can typically grow 3-5 spinach plants, spaced 2-4 inches apart for optimal growth [1, 3].
What fertilizer is best for container spinach?
A balanced liquid organic fertilizer, such as fish emulsion, applied every 2-3 weeks, is excellent for container spinach, boosting nutrient content like magnesium [1].
Why are my container spinach leaves turning yellow?
Yellowing spinach leaves in containers often indicate overwatering, poor drainage, or a nutrient deficiency. Ensure proper drainage and consistent, but not excessive, moisture [1].
Does spinach need full sun in a container?
Spinach needs 4-6 hours of direct sunlight daily. However, it is a cool-season crop, so in hot climates, it benefits from afternoon shade to prevent bolting [1, 5].
Can spinach be harvested multiple times?
Yes, spinach is excellent for “cut-and-come-again” harvesting. By picking the outer leaves and leaving the crown intact, plants will continue to produce new leaves for weeks [2].