Best Soil Mix for Container Gardening (Complete Guide)
Quick Answer: The best soil mix for container gardening is typically a high-quality potting mix designed specifically for pots, as it provides essential drainage, aeration, and nutrient retention that dense garden soil cannot. This specialized blend usually combines peat moss or coco coir for moisture, perlite or vermiculite for drainage, and compost or other organic matter for nutrients, creating an ideal environment for roots to thrive in confined spaces.
Key Takeaways:
- Container plants require a specialized potting mix, not heavy garden soil, to ensure proper drainage and aeration.
- A good potting mix prevents compaction, which is crucial for root health in containers.
- Key ingredients often include a base (peat, coco coir), aerators (perlite, vermiculite), and organic matter (compost).
- DIY soil mixes allow customization for specific plant needs and can be more cost-effective.
- Regular feeding with liquid fertilizers is necessary, as potting mixes typically have limited long-term nutrients.
- Choosing the right soil prevents common container gardening issues like root rot and nutrient deficiencies.
- Different plants, such as vegetables or succulents, may benefit from slightly modified soil compositions.
- Repurposing old potting soil is possible but requires revitalization with fresh organic matter.
Why is Specialized Soil Crucial for Container Gardening?
Specialized soil is crucial for container gardening because plants in pots face unique challenges, primarily limited space and restricted drainage, which traditional garden soil cannot adequately address. Unlike garden beds where roots can spread freely and excess water drains into the surrounding earth, containers can quickly become waterlogged or compacted if filled with heavy, dense soil.
When growing plants in containers, the soil needs to fulfill several specific requirements:
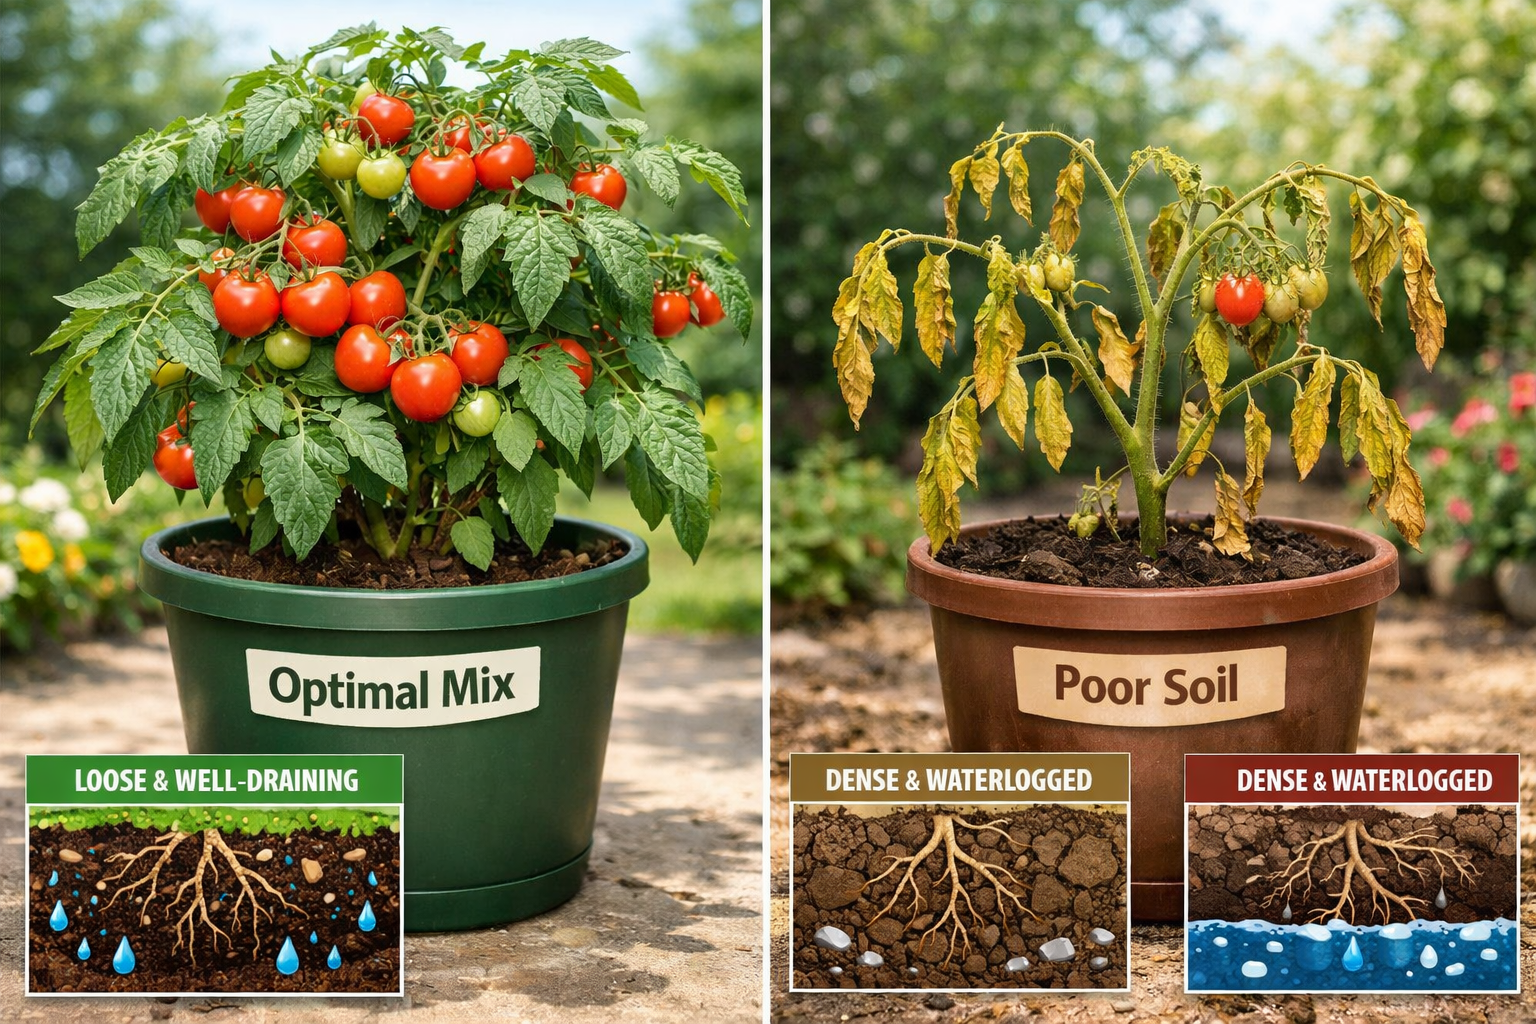
- Excellent Drainage: Water must be able to move through the soil and out the container’s drainage holes quickly. Poor drainage leads to waterlogged conditions, suffocating roots and causing root rot.
- Good Aeration: Roots need oxygen to respire and absorb nutrients. A well-aerated soil mix contains sufficient air pockets, preventing compaction that can cut off oxygen supply.
- Moisture Retention: While drainage is vital, the mix must also hold enough moisture to keep plants hydrated between waterings. This balance is often achieved with ingredients like peat moss or coco coir.
- Nutrient Supply: Potting mixes usually contain some nutrients to support initial plant growth, often from compost or added slow-release fertilizers. However, due to frequent watering, nutrients leach out faster than in garden beds, requiring supplementary feeding.
- Lightweight Structure: A lighter mix makes containers easier to move and reduces stress on plant roots by allowing them to spread without resistance.
- Disease-Free: Commercial potting mixes are typically sterile or pasteurized, reducing the risk of introducing soil-borne diseases, pests, and weed seeds into your containers.
Choosing regular garden soil or topsoil for containers is a common mistake that often leads to plant failure because these soils are too heavy, compact easily, and lack sufficient drainage and aeration for a confined environment. For a deeper understanding of soil basics, refer to our “Soil Basics for Container Gardening: 2026 Expert Guide” at Soil Basics for Container Gardening: 2026 Expert Guide.
What are the Essential Components of a Quality Container Potting Mix?
A quality container potting mix combines a few essential components to create the perfect balance of drainage, aeration, and moisture retention for container-bound plants. These ingredients work synergistically to mimic the benefits of healthy garden soil while addressing the unique constraints of pots.
Here are the core components you’ll find or use in a good potting mix:
Base Material (for moisture retention):
- Peat Moss: Excellent at holding water and nutrients, and it lightens the mix. It’s naturally acidic, which benefits many plants but may need liming for alkaline-loving species.
- Coco Coir: A sustainable alternative to peat moss, made from coconut husks. It also retains water well, provides good aeration, and has a more neutral pH.
- Compost: Adds structure, improves moisture retention, and provides a slow release of nutrients. Use well-aged, finished compost to avoid nutrient burn or pests.
Aeration and Drainage Amendments:
- Perlite: White, lightweight volcanic glass that creates air pockets, improving drainage and preventing compaction. It doesn’t absorb water but rather helps water move through the soil.
- Vermiculite: A mica mineral that expands when heated. It improves aeration but also retains significant moisture and nutrients, making it a good choice for seed starting and moisture-loving plants.
- Coarse Sand (Horticultural Grade): While sometimes used, it should be coarse (not play sand) to aid drainage. Use sparingly, as too much can make the mix heavy.
Nutrient Enhancers (Optional but Recommended):
- Worm Castings: An organic amendment rich in beneficial microbes and trace minerals, acting as a slow-release fertilizer.
- Bone Meal or Blood Meal: Organic sources of phosphorus (bone meal) and nitrogen (blood meal) for specific plant needs.
- Balanced Slow-Release Fertilizer: Provides a steady supply of nutrients over several months, reducing the frequency of liquid feeding.
Decision Rule: Choose a mix with peat moss if you need an acidic base or are on a budget, but opt for coco coir if you prioritize sustainability and a neutral pH. Always include perlite for general container gardening, and consider vermiculite if you need extra moisture retention, especially for seedlings or tropical plants.
Commercial vs. DIY Soil Mixes: Which is Best for You?
Choosing between commercial potting mixes and creating your own DIY blend depends on your budget, specific plant needs, and gardening experience. Commercial mixes offer convenience and consistency, while DIY options provide customization and can be more economical in the long run.
Commercial Potting Mixes
Commercial potting mixes are pre-formulated blends designed for general container gardening. They are readily available and provide a sterile, balanced environment.
Pros:
- Convenience: Ready to use directly from the bag.
- Sterile: Generally free of pests, diseases, and weed seeds.
- Balanced: Formulated to provide good drainage, aeration, and moisture retention.
- Consistent Quality: Reputable brands offer reliable performance.
Cons:
- Cost: Can be expensive, especially for large-scale container gardens.
- Limited Customization: May not be optimized for all plant types (e.g., succulents need faster drainage, heavy feeders need more nutrients).
- Nutrient Depletion: Most mixes only have enough nutrients for 4-6 weeks of growth, requiring supplemental fertilization afterward.
When to Choose Commercial: Opt for commercial potting mixes if you are a beginner, have only a few containers, prefer convenience, or want to guarantee a sterile start for your plants.
DIY Potting Mixes
Creating your own soil mix allows you to tailor the composition to specific plants and potentially save money.
Pros:
- Customization: You can adjust ratios for drainage, moisture, and nutrients based on plant requirements (e.g., a sandy mix for cacti, a rich mix for vegetables).
- Cost-Effective: Buying ingredients in bulk can be cheaper than purchasing pre-made bags, especially for extensive gardens.
- Control over Ingredients: You know exactly what goes into your soil, allowing you to use organic or specific local amendments.
- Sustainability: Can incorporate homemade compost or local materials, reducing reliance on mass-produced products.
Cons:
- Time and Effort: Requires sourcing ingredients, measuring, and mixing.
- Potential for Imbalance: Incorrect ratios can lead to poor drainage or nutrient issues.
- Sterilization: May need to sterilize components if using garden soil or uncomposted organic matter to prevent pests and diseases.
When to Choose DIY: Consider a DIY approach if you have many containers, grow specialized plants (like succulents or specific vegetables), enjoy hands-on gardening, or want to reduce costs.
Crafting Your Own Best Soil Mix for Container Gardening: Recipes and Tips
Crafting your own best soil mix for container gardening allows you to precisely meet the needs of different plants while often saving money. The key is to balance moisture retention, drainage, and nutrient availability.
Here are some popular DIY recipes and tips for general container gardening and specific plant types:
General All-Purpose Container Mix
This mix is excellent for most annuals, perennials, herbs, and many vegetables.
Ingredients:
- 1 part Peat Moss or Coco Coir (for moisture retention)
- 1 part Perlite (for drainage and aeration)
- 1 part High-Quality Compost or Worm Castings (for nutrients and structure)
Instructions:
- Combine all ingredients in a large mixing bin or wheelbarrow.
- Mix thoroughly until uniform.
- Add a small amount of horticultural lime if using peat moss, especially for plants that prefer a neutral to slightly alkaline pH, to adjust acidity. Coco coir is naturally more neutral.
- Optionally, add a balanced slow-release granular fertilizer according to package directions.
Vegetable Container Mix
Vegetables are often heavy feeders and require a richer mix. For more specific vegetable soil needs, check out our “Best Soil Mix for Vegetables: 2026 Guide to Thriving Garden” at Best Soil Mix for Vegetables: 2026 Guide to Thriving Garden.
Ingredients:
- 2 parts Peat Moss or Coco Coir
- 1 part Perlite or Vermiculite (vermiculite holds more moisture and nutrients, beneficial for vegetables)
- 2 parts Well-Aged Compost
- 1/2 part Worm Castings (optional, for extra nutrients)
- 1/4 cup balanced organic fertilizer per 5 gallons of mix (e.g., 5-5-5 NPK)
Instructions:
- Follow the same mixing steps as the all-purpose mix.
- Ensure thorough blending of all nutrient amendments for even distribution.
Succulent/Cactus Mix
Succulents and cacti require extremely fast-draining soil to prevent root rot.
Ingredients:
- 1 part Commercial Potting Mix (all-purpose)
- 1 part Perlite or Pumice
- 1 part Coarse Sand (horticultural grade)
Instructions:
- Mix thoroughly. The goal is a gritty, fast-draining consistency.
Tips for Success:
- Moisten First: Lightly moisten peat moss or coco coir before mixing to prevent dust and ensure even moisture distribution.
- Mix Thoroughly: Take the time to completely blend all ingredients to ensure uniform properties throughout the container.
- Sterilization (if using garden soil): If incorporating any amount of garden soil (generally not recommended for containers due to compaction), you may need to sterilize it to kill pathogens and weed seeds. This can be done by baking it in an oven or using solarization.
- Test Your Mix: Before planting, fill a pot and water it. Observe how quickly water drains. If it pools for too long, add more perlite or sand. If it drains too quickly and doesn’t retain enough moisture, add more coco coir or compost.
Remember that even the best soil mix will eventually need nutrient replenishment. Regular feeding with a balanced liquid fertilizer is essential for long-term plant health in containers.